
How to Install Outdoor Internet for RVs and Remote Work
Reliable outdoor internet can make or break your remote workday or RV adventure across the Mid-Atlantic. Staying connected as you travel means juggling changing environments, unique data needs, and shifting coverage zones from Pennsylvania mountains to the Maryland coast. Outdoor connectivity comes down to finding equipment and plans that actually suit your travel style, technical demands, and security needs. This guide walks you through practical steps to assess, choose, and set up dependable internet that keeps you productive wherever your journey takes you.
Table of Contents
- Step 1: Assess Your Outdoor Connectivity Needs
- Step 2: Choose The Right Outdoor Internet Equipment
- Step 3: Set Up Your Wireless Router And Antenna
- Step 4: Secure Your Outdoor Network Configuration
- Step 5: Test And Optimize Your Outdoor Internet Connection
Quick Summary
| Key Insight | Explanation |
|---|---|
| 1. Assess Your Connectivity Needs | Identify your specific internet usage and requirements as an RV traveler. Understanding your needs prevents wasting money on ineffective solutions. |
| 2. Choose Suitable Equipment | Select internet equipment based on your connectivity needs, budget, and the technological options available in your travel areas. |
| 3. Secure Your Network | Update your router’s firmware and use strong passwords to enhance your network security, protecting sensitive information while traveling. |
| 4. Test Your Connection Effectively | Regularly run speed tests and check for signal quality to ensure your internet setup meets your work requirements. |
| 5. Optimize Based on Findings | Troubleshoot and adjust equipment placement or settings based on testing results to improve performance in your specific environment. |
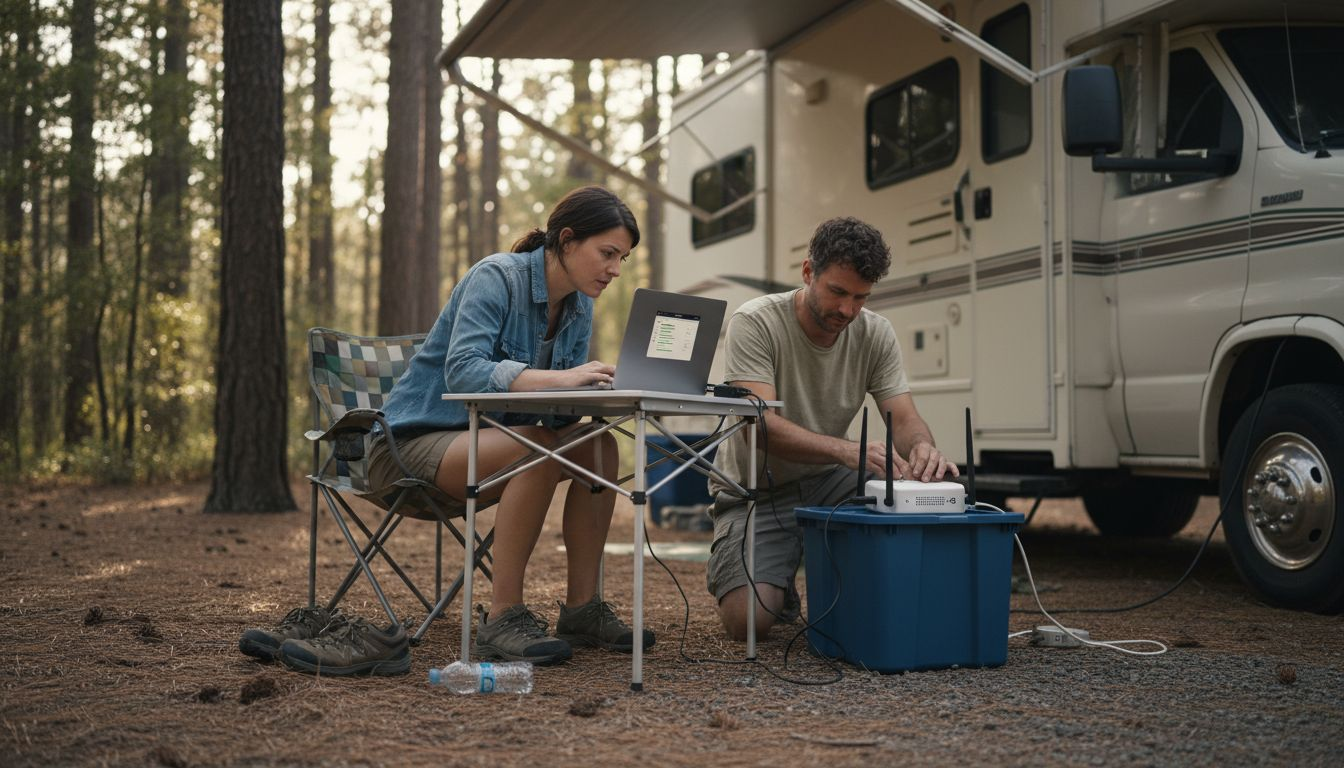
Step 1: Assess Your Outdoor Connectivity Needs
Before you invest in equipment or commit to a plan, take time to understand what connectivity actually means for your specific situation. Your needs as an RV traveler differ significantly from someone working remotely from a fixed outdoor location. The assessment phase determines which solutions will genuinely work for you and which will waste your money.
Start by identifying your primary use case. Are you working full time via video calls and cloud applications? Streaming entertainment during downtime? Simply staying connected for email and messaging? Occupational requirements and internet speed necessities vary dramatically depending on your work. A software developer needs different bandwidth than someone managing administrative tasks. Someone uploading video files requires faster upload speeds than someone browsing the web. Write down exactly what you do online and how often you do it.
Next, evaluate your travel patterns and locations. Where do you spend most of your time? Do you stay in one region like the Mid-Atlantic, or do you move between states regularly? Assessment of connection types available and bandwidth needs depends on understanding your coverage area and mobility requirements. Certain areas have excellent 5G coverage while others rely on 4G LTE or satellite options. Knowing your typical routes helps you choose technology that actually works where you are.
Consider your budget and performance expectations. Faster speeds and more reliable coverage cost more. You need to decide what trade-offs matter most to you. Can you accept occasional slow speeds to save money? Do you need bulletproof reliability for client calls? This clarity prevents buyer’s remorse when you realize your choice doesn’t match your actual lifestyle.
Also assess your power and storage capabilities. Internet equipment requires electricity, which RVs sometimes struggle to provide continuously. Some devices drain your battery faster than others. Think about your generator capacity, solar panels, and willingness to run power during the day.
Pro tip: Document your typical daily data usage by checking your current phone or home internet bill for the next week. This concrete number beats guessing about your needs and helps you pick the right plan size.
Step 2: Choose the Right Outdoor Internet Equipment
Now that you understand your connectivity needs, it’s time to select the actual equipment that will deliver internet to your RV or remote workspace. The right choice depends on balancing speed, reliability, portability, and cost for your specific travel patterns.
Start by comparing the major technology options available to you. 4G LTE provides solid coverage across most of the Mid-Atlantic and offers reasonable speeds for general use. 5G delivers faster speeds where available but has more limited coverage outside urban areas. Satellite internet works anywhere but introduces latency that can frustrate video calls. WiFi 6 routers and modern hotspots give you flexibility in how you connect. Step-by-step rural internet setup guidance helps you understand which technology matches your location and usage patterns best.
When selecting specific devices, prioritize quality and durability. Your equipment will face temperature swings, humidity, dust, and constant movement in an RV. Look for routers and hotspots rated for outdoor conditions with sturdy antennas rather than flimsy internal ones. Secure wireless routers and antenna systems are essential for protecting your work data and personal information while traveling. Avoid budget equipment that cuts corners on construction or security features.
Security matters more than most RV travelers realize. You’ll be handling sensitive information, processing payments, or accessing company networks from public spaces. Choose devices that support VPN connections and come with strong encryption built in. Configuring your outdoor network device with strong encryption and passwords protects you from unauthorized access in RV parks and campgrounds where many networks overlap.
Consider power consumption carefully. Some hotspots and routers drain batteries quickly, while others are designed for efficiency. Check the specifications and ask yourself honestly about your power setup. Can you comfortably recharge daily? Do you have solar panels or a generator? This reality check prevents frustration when your device dies midday.
Here’s a comparison of major outdoor internet technologies for RV and remote setups:
| Technology | Coverage Area | Speed Potential | Best For |
|---|---|---|---|
| 4G LTE | Most urban and rural regions | 10–50 Mbps typical | General use, email, basic streaming |
| 5G | Mainly urban, expanding | 50–300 Mbps or higher | High-bandwidth tasks, video calls |
| Satellite | Virtually anywhere, clear sky | Varies, 12–150 Mbps, high latency | Remote areas, low coverage locations |
| WiFi 6 Hotspot | Local, depends on source Wi-Fi | Up to gigabit on strong source | Campgrounds, shared Wi-Fi networks |
Pro tip: Buy equipment with a return policy and test it for one week in your actual travel environment before committing fully to it. What works in a store may behave differently in your RV’s specific location and power setup.
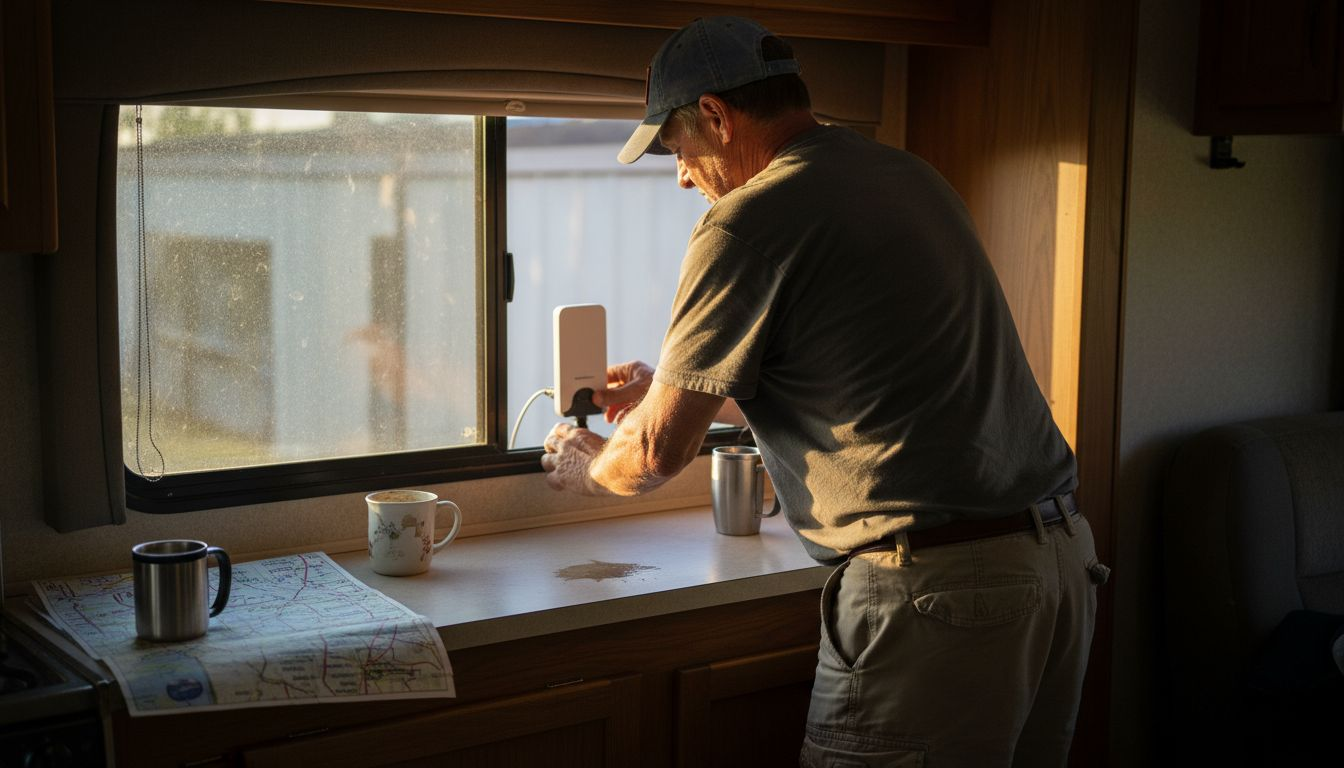
Step 3: Set Up Your Wireless Router and Antenna
Physical placement and configuration transform your equipment from useful to genuinely reliable. A perfectly good router positioned incorrectly will disappoint you. This step ensures your hardware actually performs as intended in your specific RV setup.
Start by finding the optimal location for your router and antenna inside your RV. Mount your antenna as high as possible and away from large metal objects that block signals. Position your router where it can reach the most living spaces. Exterior mounting works better than burying equipment in a cabinet. Temperature and moisture matter too, so ensure your equipment has ventilation and doesn’t get baked by direct sunlight or frozen at night. Antenna alignment and placement maximize signal coverage and connectivity reliability for your outdoor setup.
Next, access your router’s admin panel through a web browser or mobile app. This is where you configure the network settings that make everything work. You’ll need to set up a Wi-Fi network name and password for your devices to connect. Choose a strong password you can remember but others cannot guess easily. Change the default admin password immediately to prevent unauthorized access to your router settings.
Select the right Wi-Fi channel for your environment. In crowded RV parks, neighboring networks can interfere with yours. Try channels 1, 6, or 11 on 2.4 GHz if you’re experiencing interference. Choosing proper Wi-Fi channels and confirming signal strength requires testing to find what works best in your location. Move your antenna slightly or adjust channel settings if your connection feels sluggish.
Once configured, connect your work devices to the network and verify they have internet access. Open a web browser and load a simple website to confirm connectivity works. Check that all your devices appear on the same network and can see each other. Run a speed test to understand your actual bandwidth, which helps set realistic expectations for video calls and file uploads.
Pro tip: Document your router settings, Wi-Fi password, and admin login information in a secure location outside your RV in case you need remote access to troubleshoot connectivity problems while traveling.
Step 4: Secure Your Outdoor Network Configuration
Your outdoor network is only as strong as its security measures. Working from RV parks and campgrounds exposes your data to risks that stationary home networks rarely face. This step protects your sensitive information and prevents unauthorized access to your system.
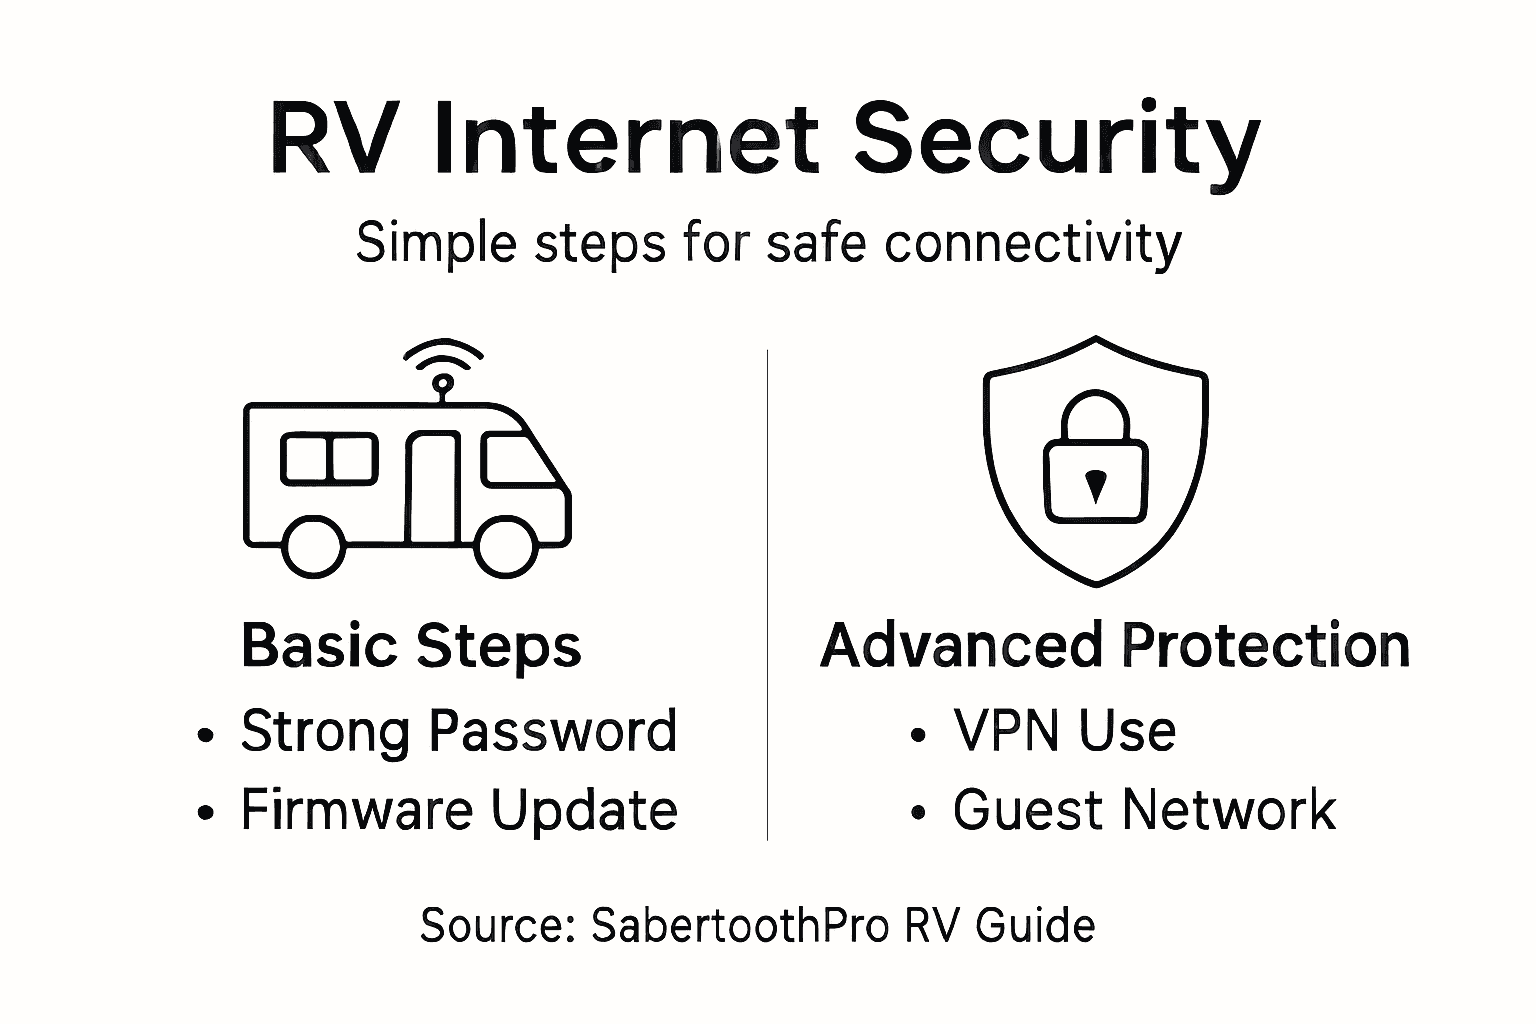
Begin by updating your router’s firmware immediately after setup. Manufacturers release security patches regularly to address newly discovered vulnerabilities. Check your router’s admin panel for available updates and install them without delay. Old firmware is a known entry point for hackers targeting RV travelers and remote workers. This single action blocks many common attack vectors before they become problems.
Next, establish strong passwords and enable encryption on your network. Implementing network access controls and encrypting communications prevents unauthorized devices from connecting and protects your transmitted data. Change your Wi-Fi password from the default to something complex with uppercase letters, numbers, and symbols. Use WPA3 encryption if your router supports it, or WPA2 if not. Both are significantly more secure than older WEP encryption standards.
Enable Multi-Factor Authentication where possible and always use a VPN when accessing work systems. A VPN creates an encrypted tunnel for your data, making it virtually impossible for someone on the same network to intercept your information. Using VPNs provides encrypted tunnels for data security during remote work. This is particularly important when handling client information, processing payments, or accessing company networks from public locations.
Disable any router features you don’t actively use. Turn off WPS (Wi-Fi Protected Setup) and disable remote management features. These conveniences create security gaps that bad actors exploit. Regularly review your connected devices list and remove anything you don’t recognize immediately.
Below is a summary of key router and Wi-Fi security measures to safeguard your outdoor network:
| Security Measure | Purpose | Implementation Tip |
|---|---|---|
| Update router firmware | Patch vulnerabilities | Check for new updates monthly |
| Enable WPA3/WPA2 encryption | Protect network traffic | Select in router settings |
| Set strong unique passwords | Prevent unauthorized access | Use letters, numbers, and symbols |
| Disable WPS and remote mgmt | Reduce hacking risks | Turn off in advanced options |
| Use a VPN connection | Encrypt data transmissions | Connect VPN on all key devices |
Pro tip: Create a separate guest network on your router for visitors and casual use, keeping your primary work network isolated and more secure from potential threats introduced by temporary connections.
Step 5: Test and Optimize Your Outdoor Internet Connection
Configuration is complete, but now you need to verify everything performs as expected. Testing reveals whether your setup actually delivers the speeds and reliability you need for remote work. This step separates working theory from practical reality.
Start by running a speed test on your connection. Open a web browser and visit a speed test site to measure your download and upload speeds. Test multiple times throughout the day since signal strength varies. Morning speeds might differ significantly from afternoon or evening performance. Compare your actual speeds to what your plan promises. If you’re getting dramatically lower speeds, antenna placement or router settings need adjustment.
Check your signal strength next. Most router admin panels display signal quality as a percentage or dBm measurement. Strong signals typically read between 0 to negative 30 dBm. Weak signals below negative 70 dBm indicate placement issues. Move your antenna slightly or reposition your router if you see weak signals. Adjusting antenna placement and monitoring signal strength directly improves your connection reliability during remote work sessions.
Test for latency and packet loss by running a ping test. Open your computer’s command prompt or terminal and ping a reliable website. Latency below 100 milliseconds works well for video calls and real-time work. Packet loss should be zero or nearly zero. High latency or packet loss suggests interference or coverage problems requiring troubleshooting.
Now optimize based on your findings. If speeds are acceptable but inconsistent, try switching Wi-Fi channels to reduce interference from neighboring networks. Switching channels to reduce interference ensures reliable performance in crowded RV parks. Test each channel briefly to identify which one delivers the most stable connection. Keep notes about which channels work best in different locations as you travel.
Test your connection with actual work tasks. Run a video call, upload a file, and work through your typical day. This real-world testing reveals whether your setup genuinely supports your needs or if you need further adjustments.
Pro tip: Run speed tests from the exact spot where you’ll work most often, not just near your router, since dead zones and interference patterns vary significantly throughout your RV.
Achieve Reliable Outdoor Internet for Your RV and Remote Work Needs
Installing outdoor internet for your RV or remote workspace presents unique challenges such as choosing the right equipment, securing your connection, and optimizing signal strength for consistent performance. You want high-speed, reliable connectivity that supports video calls, cloud access, and streaming without interruptions, no matter where you travel. The struggle to find durable, secure devices that operate efficiently on limited power while maintaining privacy can be frustrating.
SabertoothPro offers a comprehensive range of solutions tailored specifically for these exact demands. Explore our Titan WiFi collection featuring rugged routers designed for outdoor conditions and seamless connectivity. Pair your setup with flexible data options from our Titan WiFi Hotspot Plans so you stay connected in urban or remote locations across the Mid-Atlantic and beyond. Optimize your signal coverage further with our WiFi extenders engineered to eliminate dead zones inside your RV or outdoor workspace.

Don’t let unreliable outdoor internet ruin your remote work or travel experience. Visit SabertoothPro.com today to find the right high-speed internet devices, plans, and expert solutions that bring secure and consistent connectivity within reach. Take control of your connectivity now and enjoy your work and travel on your terms.
Frequently Asked Questions
How do I assess my outdoor connectivity needs for an RV?
To assess your outdoor connectivity needs, start by identifying your primary use case, such as video calls or basic email. Write down your typical online activities and frequency to determine the required bandwidth and speed.
What types of outdoor internet equipment should I consider for my RV?
Consider various technologies like 4G LTE, 5G, and satellite internet based on your travel patterns and speed requirements. Prioritize equipment that can withstand outdoor conditions and ensure it has security features to protect your data.
How can I optimize the placement of my wireless router and antenna in my RV?
To optimize placement, mount your antenna as high as possible and away from large metal objects. Make sure your router is located for maximum reach within your RV, preferably in areas with good ventilation.
What security measures should I implement for my outdoor internet setup?
Implement strong passwords and enable encryption on your network to protect against unauthorized access. Regularly update your router’s firmware to address vulnerabilities and use a VPN for secure data transmission while working.
How can I test the reliability of my internet connection in my RV?
Test reliability by running speed tests at different times of the day to check for variances in speed. Additionally, perform real-world tasks like video calls and file uploads to ensure your setup meets your connectivity needs effectively.
What steps should I take if my internet speeds are lower than expected?
If your speeds are lower than expected, first check your signal strength and reposition your antenna or router if necessary. Additionally, try switching your Wi-Fi channel to avoid interference from neighboring networks for improved performance.